Intruduction
I really felt in love with Node-RED and I get really obsessed about it.So over the years more and more functionalities moved from other User Interfaces to Node-RED.
Now I have reached a maturity level, where I’m willed to show the outside world, that means my family, what I have done. Until now I have operated the Dashboard UI with my desktop, but when I launch this UI to my familiy I have to be careful with the User Experience (UX).
Problem Statement
So when using the Node-RED Dashboard one does usually navigate with the left hand menu bar. My approach is more Kiosk style driven, meaning that I’d like to work more with buttons on the screen. Therefore I have to
- Design a Home Screen that allows to jump to the according page
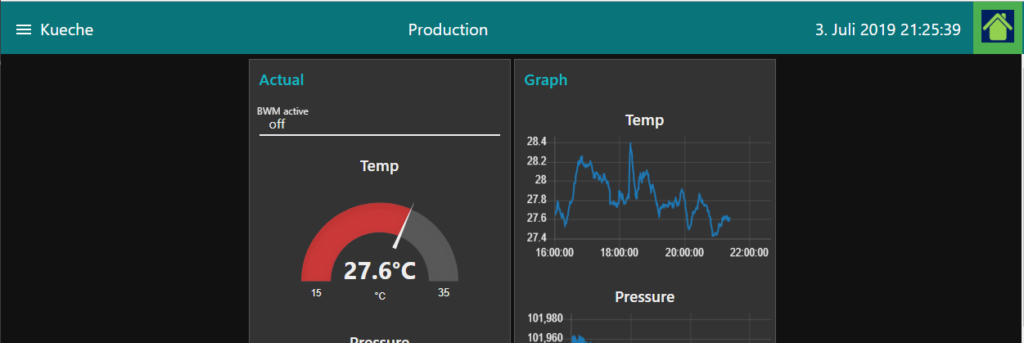
- Remove the menu bar in the header
- Add a „Home“ Button in the header to allow the users to go back to the Home Screen from whereever they are.
- Optional: Add the current date and time on the right hand uppen corner.
I had something like this in my mind.
I searched the web and one of the best sources is, of course, https://discourse.nodered.org. Especially this topic caught my attention. https://discourse.nodered.org/t/button-in-topbar/6377
Tools and Architecture
I’m not the most experience Javascript developer, so I tried a little bit and it worked out pretty well. The hardest thing for me was to understand, how the CSS works in conjunction with the top bar.
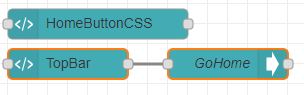
So actually there are three nodes here.
- The dashboard template node for the actual top bar („HomeButtonCSS“)
- The dashboard template node holder the CSS information for design („TopBar“)
- The dashboard ui control node that received the page from the template node and tells the browser to go to that page.
Code
To make sure that the image (the little house) is aligned with the button, the following CSS is required. If you want to have a frame around the button, change the padding and adjust the size according.y
<style>
.btnHome_class {
  background-color: #4CAF50; /* Green */
  border: none;
  height: 60px;
  width: 60px;
  padding: 10px 10px 10px 10px; /* Frame around the image. Adjust height and width accordingly */
  vertical-align: middle; /* Align button w/ top bar */
}
</style>
The actual text, button and date/time are created with the following script
<script id="TopHeader" type="text/javascript">

var home = new Object();
home.payload = 'Home'; // This is the payload that goes out

var theScope = scope;
var clockInterval;

$(function () {
    if (clockInterval) return;

    //add clock
    var divClock = $('<div />');
    var p = $('<p />');
    divClock.append(p);
    divClock[0].style.margin = '15px';

    function addZero(i) {
        if (i < 10) {
            i = "0" + i
        }
        return i;
    }

    function formatDate(date) {
        var monthNames = ["Januar", "Februar", "März", "April", "Mai", "Juni", "Juli", "August", "September", "Oktober", "November", "Dezember"];
        var day = date.getDate();
        var monthIndex = date.getMonth();
        var year = date.getFullYear();
        var hour = addZero(date.getHours());
        var minute = addZero(date.getMinutes());
        var second = addZero(date.getSeconds());
        return day + '. ' + monthNames[monthIndex] + ' ' + year + " " + hour +':' + minute + ':' + second;
    }

    function displayTime() {
        p.text( formatDate( new Date() ) );
    }

    clockInterval = setInterval(displayTime, 1000);

    // add Text
    var divText = $('<div />');
    var t = document.createTextNode("Production"); // <== add title here
    divText.append(t)
    divText[0].style.margin = '40px auto';
    divText[0].style.size = '40';

    // add button
    var divButton = $('<div />');
    var button = document.createElement("BUTTON");
    var b = document.createTextNode("Home Screen")
    button.height=40;
    button.width=40;
    button.appendChild(b);
    button.addEventListener("click", doIT.bind(null,home));
    divButton.append(button);

    //
    // Add Button picture button
    //

    var divPicButton =$('<div />');
    var btn_Home = document.createElement("BUTTON");
    btn_Home.setAttribute("class", "btnHome_class");

    var pic = new Image();
    pic.src = "/Home1.png"; // <== add path and filename of picture here
    pic.height=40;
    pic.width=40;
    btn_Home.appendChild(pic);
    pic.addEventListener("click", doThis.bind(null,home));
    divPicButton.append(btn_Home);

    //add to toolbar when it's available
    var addToToolbarTimer;

    function addToToolbar() {

        var toolbar = $('.md-toolbar-tools');
        if(!toolbar.length) return;

        // toolbar.append(divButton);
        toolbar.append(divText);
        toolbar.append(divClock);
        toolbar.append(divPicButton)
        clearInterval(addToToolbarTimer);
    }

    addToToolbarTimer = setInterval(addToToolbar, 100);

    function doIT(m){
        theScope.send( m )
    }

    function doThis(m){
        theScope.send( m )
    }

});

</script>
Github Ressources
Additional ressource
- Discussion about using standard JavaScript or Jquery for the creating of the div element including a browser benchmark. https://stackoverflow.com/questions/9422974/createelement-with-id/9423015
Credits
- Post regarding top bar: https://discourse.nodered.org/t/button-in-topbar/6377
- And as always the Node-RED forum moderated and supported by wonderful people: https://discourse.nodered.org/